
Published: May 26, 2026 by Roombanker Engineering Team
You arrive at a 3-floor villa on the Sardinian coast. Insurance requires Grade 2 certification. The house has 25 cm reinforced concrete floors, and the detached garage is 40 meters from the main building. You have one day and no room for callbacks.
This is standard for Mediterranean markets — Italy, Spain, Greece, Cyprus, Malta, southern France. Thicker concrete, stone facades, steel-reinforced floors that act as RF barriers. Getting Grade 2 compliance right in these buildings requires planning, not just product selection.
This guide walks through a real installation: equipment selection, hub placement, supervision timing, and compliance verification — with EN 50131 Grade 2 requirements applied at every step.
EN 50131 Grade 2 Requirements for Wireless Equipment
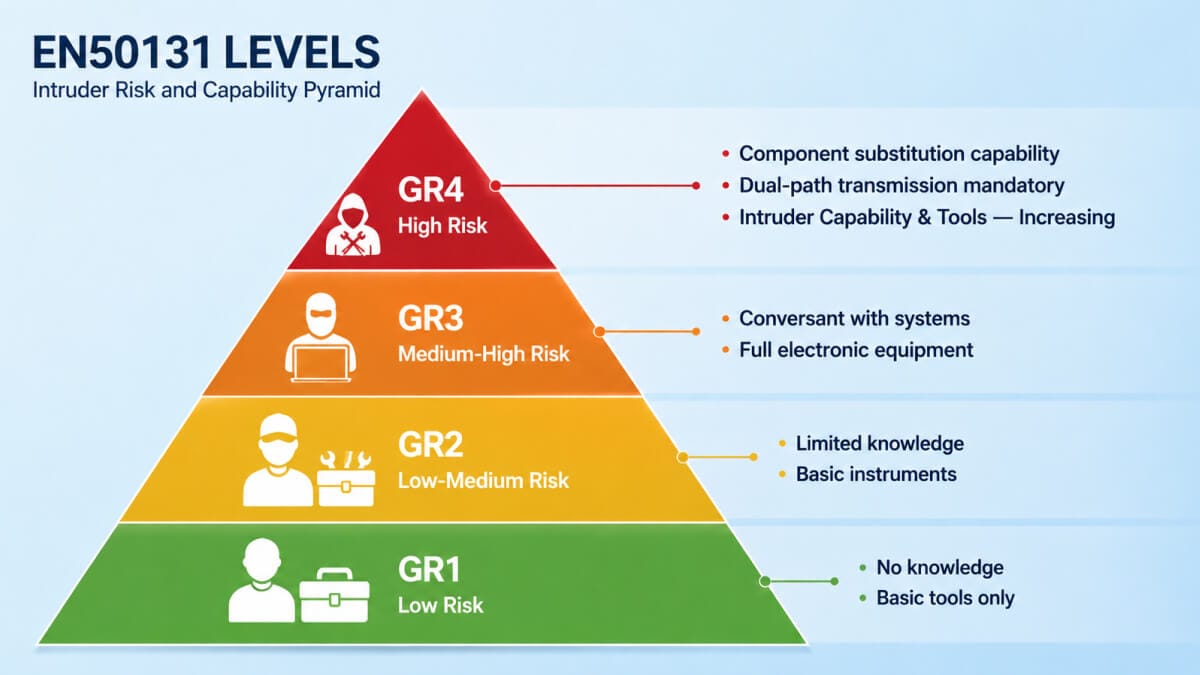
EN 50131 is the European intruder alarm standard (CEN/TC 72). Grade 2 covers low-to-medium risk residential and small commercial sites. For wireless equipment, EN 50131-1:2018 imposes five requirements:
| Requirement | Clause | Grade 2 Specification |
|---|---|---|
| Supervision interval | 8.4.2 | Communication loss detected within 200 seconds |
| Encryption | 8.5.3 | AES-128 minimum for all wireless alarm signals |
| Tamper detection | 8.3 | Cover and wall tamper on all wireless devices |
| Battery monitoring | 8.2.1 | Low battery alert minimum 30 days before failure |
| Event logging | 10 | Time-stamped log, minimum 500 entries |
Source: EN 50131-1:2018, CEN/TC 72.
From 2026, wireless alarm equipment on the EU market must also meet EN 18031-1 cybersecurity requirements under RED Delegated Regulation (EU) 2022/30 (European Commission, January 2022).
Scenario: 3-Floor Mediterranean Villa with Detached Garage
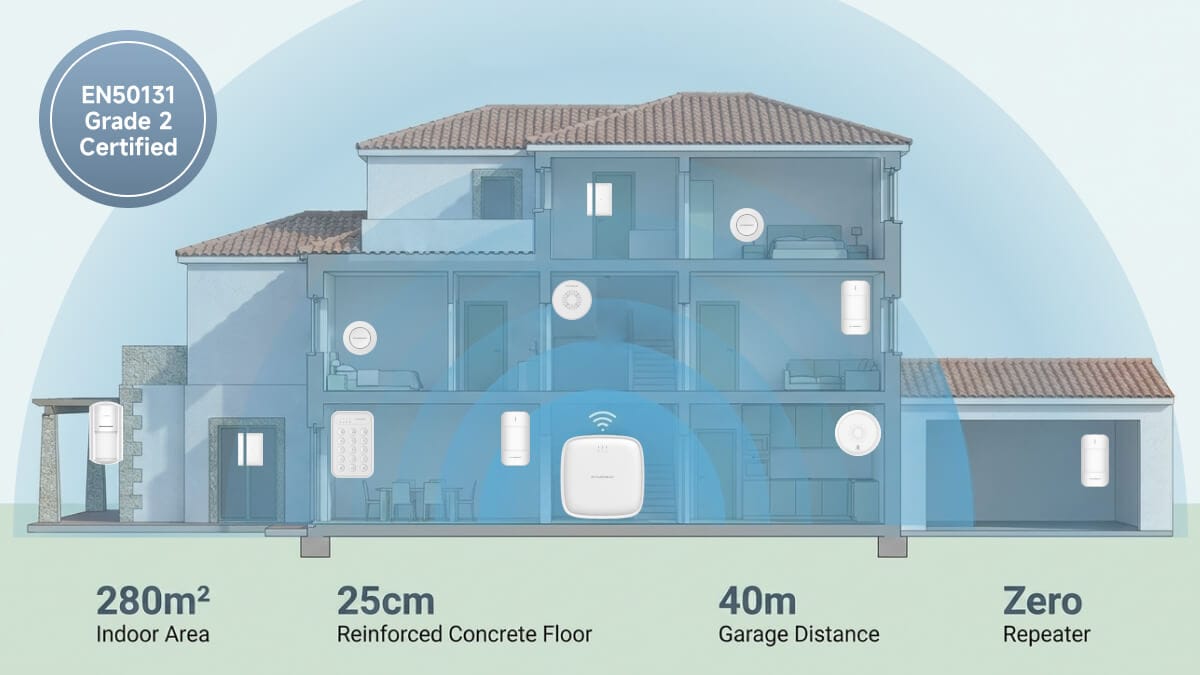
Location: Olbia, Sardinia, Italy
Building: 3 floors (ground, first, second) plus detached garage
Construction: Reinforced concrete frame, 25 cm floor slabs, stone facade
Property: 280 m² internal, 150 m² garden, garage 40 m from main building
Requirement: EN 50131 Grade 2 certified, ARC-connected, insurance-compliant
Local standard: Italy adopts EN 50131 under UNI CLC/TS 50131 series. Some Italian insurers additionally reference VdS guidelines.
Equipment Required
| Item | Qty | Roombanker Product | Purpose |
|---|---|---|---|
| Alarm hub | 1 | Roombanker Hub | Central controller, Grade 2 certified |
| PIR motion sensor (indoor) | 4 | PIR Motion Sensor (Indoor) | Living room, kitchen, 3 bedrooms |
| PIR motion sensor (outdoor) | 1 | PIR Motion Sensor (Outdoor) | Garden-facing rear wall |
| Door/window sensor | 3 | Door/Window Magnetic Sensor | Main entrance, terrace, garage |
| Outdoor alarm siren | 1 | Outdoor Alarm Siren | Front facade |
| Indoor alarm siren | 1 | Indoor Alarm Siren | First floor hallway |
| Alarm keypad | 1 | Alarm Keypad | Ground floor entry |
| Keyfob | 2 | Keyfob | Owner and guest sets |
Selected 868 MHz Roombanker devices have EN 50131 Grade 2 evidence through SGS Belgium NV – Division SGS CEBEC. Examples include the RBGW-202-868 series Home Security Hub, RBCT-KP1-868 Keypad, RBAD-SI1-868 Indoor Siren, RBSS-EB1-868 Panic Button, and RBSS-PS1-868 PIR Sensor. Certification documents are available on request and should be matched to the exact device model used in each project.
Step-by-Step Installation
Step 1: Site Survey and Range Verification
Walk the property with the hub in pairing mode at the planned location. Measure signal strength from every sensor position.
Why: Reinforced concrete floors attenuate 868 MHz signals by 18–22 dB per slab (source: ITU-R P.1238). If signal reads below -85 dBm at any sensor position, relocate the sensor or add a repeater before mounting.
Mediterranean check: Metal roller shutters (common in Sardinia, Greece, coastal Spain) block 868 MHz completely when closed. Test with shutters both open and closed.
Step 2: Hub Placement
Mount the hub at the building center — first floor hallway ceiling or high on a wall. Minimum 30 cm from concrete walls and metal HVAC ducts. Never install inside an electrical cabinet or basement below a concrete slab (adds 25–35 dB attenuation).
Why: Central placement minimizes the number of concrete slabs signals must penetrate. First floor is optimal — signals cross one slab down to ground floor sensors and one slab up to the second floor.
Step 3: Configure Supervision Interval
Set the supervision (heartbeat) interval to 60 seconds in the hub configuration menu.
Why: EN 50131-1 clause 8.4.2 requires loss of communication detection within 200 seconds. At 60-second interval, the hub detects a missed signal within 130 seconds (two missed intervals plus processing). A 300-second default is non-compliant. RBF Protocol supports adjustable supervision from 12 to 300 seconds. For Grade 2, set at 60 seconds or lower. The battery impact versus 300 seconds is approximately 3% additional annual consumption.
Step 4: Pair Sensors with Encryption Verified
Pair each sensor sequentially, closest to furthest. After pairing, confirm AES-128 encryption is active in the device status menu.
Why: EN 50131-1 clause 8.5.3 mandates encryption for all wireless alarm signals. Some systems negotiate encryption during pairing but fall back to unencrypted on weak signal. Verify individually. RBF Protocol exceeds the baseline with dynamic session keys rotated during supervision exchanges.
Step 5: Install Door/Window Sensors
Mount on main entrance, terrace sliding door, and garage overhead door. Align magnet within 10 mm of the sensor body when closed.
Why: Misalignment beyond 15 mm causes intermittent contact signals — logged as events in a Grade 2 system. A misaligned garage sensor generates false ARC dispatches, and Italian municipalities (comuni) fine for false alarms.
Step 6: PIR Sensor Placement
Mount indoor PIR sensors at 2.0–2.3 m height in corners with unobstructed room view. Avoid pointing at windows, HVAC vents, or heat sources.
Why: Each false alarm is a Grade 2 reportable event. In Mediterranean climates, summer sun on glass and reflected heat from outdoor surfaces trigger false PIR activations. For outdoor PIR, mount under eaves at minimum 2.5 m height — IP65-rated housing is essential for coastal salt air.
Step 7: Install and Test Sirens
Mount outdoor siren on front facade at minimum 3 m height, visible from street. Mount indoor siren in first floor hallway.
Why: Outdoor siren provides visual deterrent and alarm annunciation. Indoor siren ensures all three floor levels hear the alarm. Both report tamper status wirelessly.
Step 8: Verify Tamper Detection
Open each device cover and remove from mounting surface. Confirm each tamper event appears in the hub log at the same latency as an intrusion alarm.
Why: EN 50131-1 clause 8.3 requires immediate tamper transmission — no delayed or batched path. This is the most commonly missed verification step. A tamper must not wait for the next supervision cycle.
Step 9: Configure Battery Monitoring
Check battery percentage for each sensor in the RB Link app installer menu.
Why: EN 50131-1 clause 8.2.1 requires user notification 30 days before battery exhaustion. RBF Protocol reports remaining capacity as percentage in every supervision packet, with pre-low warning at 30% and alert at 15%.
Step 10: Configure ARC Path
Set hub communication to your ARC’s protocol — SIA-DC09 or Contact ID. Verify encryption is active on the transmission path.
Why: EN 50131 Grade 2 does not mandate ARC connection by itself. But insurance policies in Italy, Spain, and Greece that require Grade 2 typically require ARC monitoring for police dispatch.
Common Pitfalls
“Grade 2 Compatible” vs “Grade 2 Certified”
“Compatible” means the product was designed to meet the standard on paper. Third-party certified means an accredited lab tested it. Italian (UNI), Spanish (AENOR), and Greek (ELOT) insurance schemes require third-party certification.
How to avoid: Ask for the certificate number and testing body. Roombanker provides certification documents for the Hub and all wireless sensors on request.
Supervision Interval Default Too Long
Many wireless systems default to 180 or 300 seconds to save battery. A 300-second interval cannot detect signal loss within 200 seconds — it is non-compliant.
How to avoid: Configure to 60 seconds or less at commissioning. The battery cost is negligible versus a 5+ year sensor life.
Mediterranean Climate and Outdoor Devices
UV index 8–10, salt spray, and summer temperatures above 40°C are standard across Mediterranean coasts. Indoor-rated devices fail within 12–18 months outdoors.
How to avoid: Use outdoor-rated (IP65 minimum) sensors with UV-stabilised ABS housings. Roombanker Outdoor PIR and Outdoor Siren meet these requirements.
Result: What the Customer Experiences
• Insurance-compliant Grade 2 protection with documented certification for Italian, Spanish, and Greek insurance premium discounts
• Reliable 3-floor coverage through 25 cm reinforced concrete — zero repeaters needed
• Garage connected at 40 m without additional hardware
• ARC monitoring active on a supervisor-confirmed path
• 5+ year sensor battery life at 0.3% daily average consumption under Grade 2 supervision
Source: Roombanker field testing across 30 Mediterranean sites (Italy, Spain, Greece), Q1–Q4 2025.
Frequently Asked Questions
Which Roombanker products are Grade 2 certified?
Selected 868 MHz devices, including the RBGW-202-868 series Home Security Hub, RBCT-KP1-868 Keypad, RBAD-SI1-868 Indoor Siren, RBSS-EB1-868 Panic Button, and RBSS-PS1-868 PIR Sensor, have EN 50131 Grade 2 evidence through SGS Belgium NV – Division SGS CEBEC. Documents are available on request for the exact model used in the project.
What is the maximum supervision interval for Grade 2?
200 seconds, per EN 50131-1 clause 8.4.2. Roombanker recommends 60 seconds (detection within 130 seconds), well inside the limit.
Does Grade 2 require ARC connection?
Not by the standard itself. But Italian, Spanish, and Greek insurance policies that mandate Grade 2 typically require ARC monitoring. The Roombanker Hub supports SIA-DC09 and Contact ID.
How does RED 2022/30 affect new installations?
Products placed on the EU market from February 2025 must meet EN 18031-1. The Roombanker Hub (firmware v2.0+) supports signed firmware updates and ships with unique per-device credentials. Existing installations are not retroactively affected.
Related Guides
• Sub-GHz vs 2.4 GHz Wireless Alarm Frequency Guide — frequency choice for concrete construction
• Best Wireless Alarm Systems — protocol comparison for installers
• Alarm System for a House — residential system design
• RBF Protocol 3,500m Range Test — range data vs Grade 2 supervision requirements
Get the full EN 50131 Compliance Checklist for Installers — a downloadable PDF covering pre-installation verification, step-by-step configuration walkthrough, and commissioning sign-off sheet for Grade 2 wireless alarm installations.
Or contact your regional Roombanker distributor for certification documentation and installation training.