The foundation of a robust home security system lies in the often-overlooked yet crucial wireless sensors network, although nowadays the spotlight often falls on advanced camera systems and their capabilities.
It’s true that current home security is more advanced than ever before, and visible cameras can act as a deterrent to potential intruders, and provide real-time video footage, which helps verify alarms and reduces false alarms.
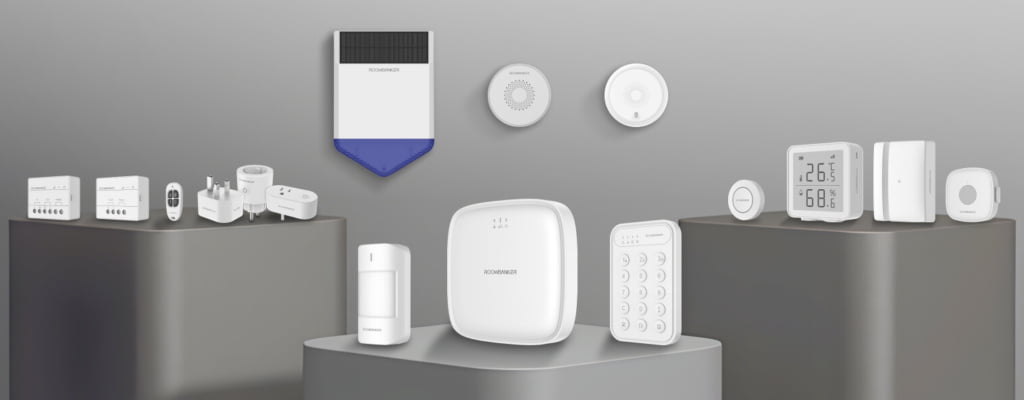
But intrusion alarm systems composed of control panels, various small and sleek detectors as well as sensors can cover areas that cameras might miss, such as windows, doors, and blind spots, offering additional layer of protection that enables homeowners to monitor their properties in many ways, such as detecting when doors or windows are opened or sensing movements through infrared technology.
Also, basic sensors and alarm panels can be more affordable compared to high-end camera systems. On the other hand, sensors and detectors do not capture images and videos, which may be preferable for privacy-conscious users.
According to Statista, the global IoT market is projected to reach over $1.6 trillion by 2025, showing a growing trust in IoT solutions like WSNs for home security. This shift to sensor-based security systems gives homeowners legitimate protection and greater control over their privacy.
What is a Wireless Sensor Network?
A Wireless Sensor Network (WSN) is a technology that ties together hundreds or thousands of tiny sensors. These aren’t just any sensors; they’re smart, capable of gathering all sorts of data from their surroundings – from how warm or cold it is to how bright the light is and even if there’s any movement.
What makes them truly special is their ability to talk to each other wirelessly, eventually creating a vast network that spans the monitored area, be it an apartment, a retail shop, or a big villa.
Each sensor can act like a mini detective, which is tirelessly gathering clues (data) and then passing these clues along until they reach a central smart hub where they’re analyzed. This is how a WSN keeps an eye on things by offering real-time insights, whether it’s making sure your home is safe, tracking the health parameters of living or working space, or monitoring people in working establishments.
In 2021, the market for such sensor networks has started booming, so it was anticipated to reach over $93 billion till last year. It reflects their critical role not just in day-to-day security and comfort but across numerous industries worldwide.
As of a recent report, the wireless sensor network market size is expected to expand at a compound annual growth rate (CAGR) of 14.4% from 2021 to 2028.
Wireless Sensor Network Architecture In Home Security Field
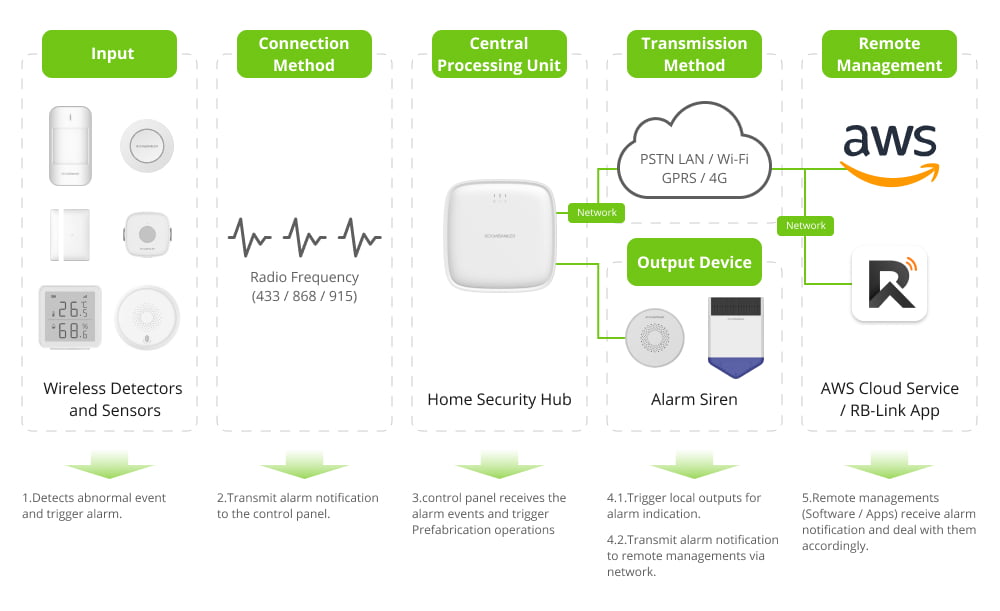
The wireless sensor network architecture for smart home security is a sophisticated blueprint composed of key components to work in harmony and create a secure, intelligent living space. In the entire smart home security system, the general architecture includes the following main parts:
Sensors and Actuators
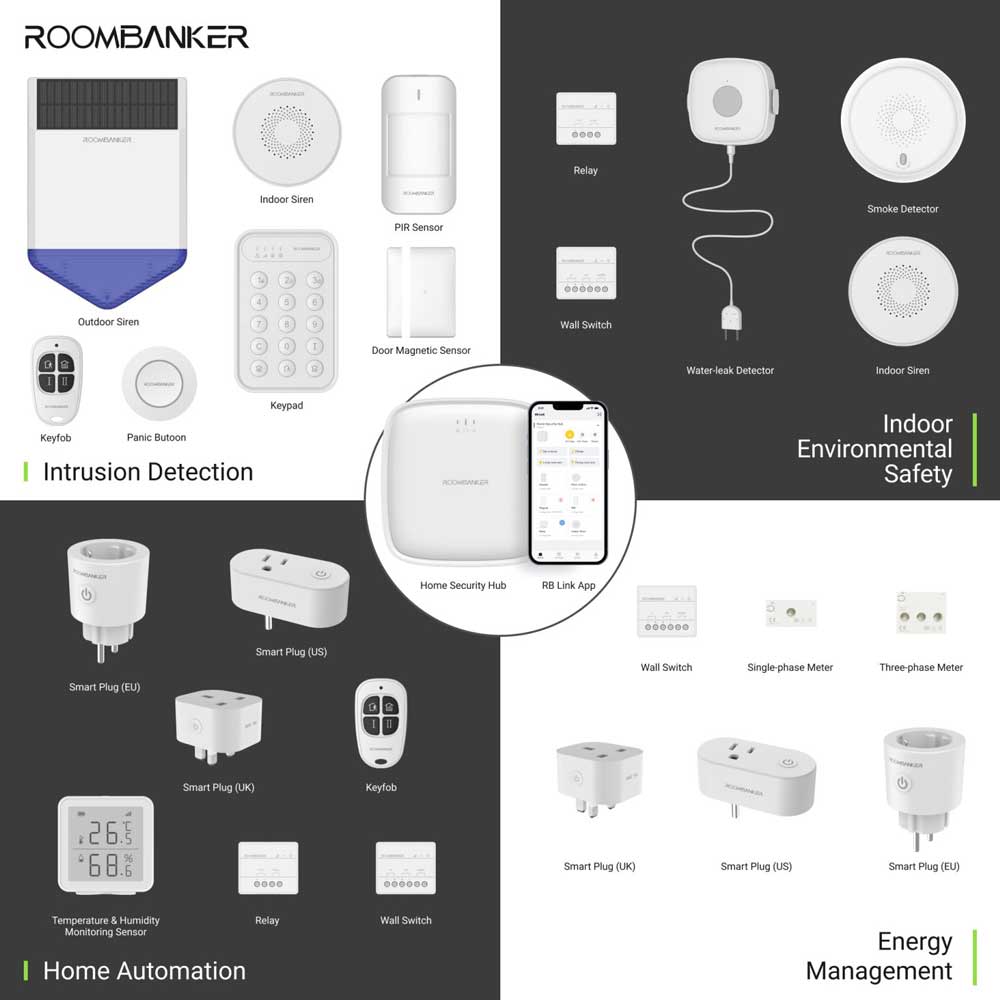
Sensors and actuators are a smart home’s eyes, ears, and hands. Sensors, including cameras, PIR motion detectors, smoke detectors, and more, constantly monitor the environment and capture data on everything happening around it to send signals to the home security hub on time.
Actuators, like smart door locks, lights and alarm sirens, act based on the sensors’ data or user commands. Together, they work seamlessly to confirm that your home responds intelligently to different situations, improving security, comfort, and convenience.
Smart Home Hub
The smart home hub is the core translator and messenger in a smart home. It takes data from sensors using various wireless protocols, such as Wi-Fi, Zigbee, BLE, Z-Wave or RBF, for communication. This one is equipped with internal processors, which interpret this data, deciding what to keep locally and what to send to the cloud for further action.
Cloud Server
Cloud servers offer the digital brain power behind smart homes. They host sophisticated databases and leverage high-performance servers to store sensor data securely. Using data analysis techniques and machine learning algorithms, these servers can make sense of patterns to help improve performance and provide insights. Users access this information via the cloud to make sure that management and monitoring can happen anywhere.
User Interface
The user interface is the homeowner’s command center, which is available as a mobile app, web platform, or through voice assistants like Amazon Alexa and Google Assistant. It presents data insights and allows direct control of home security devices.
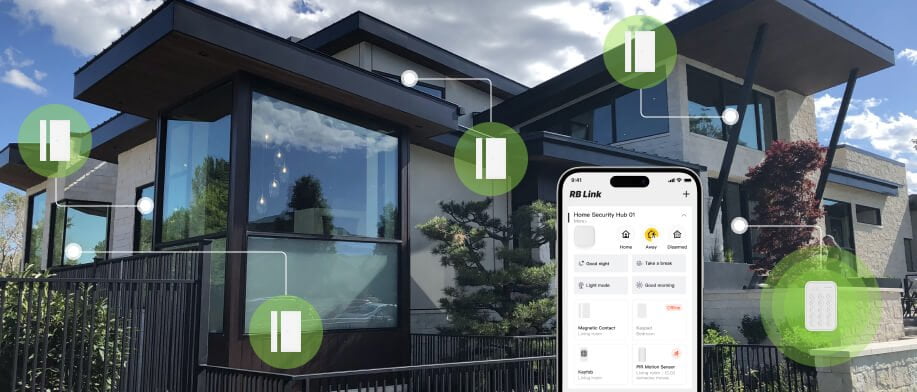
For example, we have an RB link smart home app that connects end user to its smart products and devices. With a friendly, easy-to-follow design, it serves as the primary control point for users to customize settings and preferences.
Communication Network
A mixture of the home’s local area network (LAN) and the broader Internet forms the communication network’s backbone. Wireless technologies like Wi-Fi, Zigbee, Z-Wave, and RBF underpin this network and ensure till the last moment that messages sent between sensors, actuators, the smart home hub, the cloud, and ultimately to the user must arrive securely and swiftly.
Benefits of Using Wireless Sensor Networks in Home Security Systems
Here are the benefits of using a wireless sensor network in a home security system, with each explained properly and supported by much needed statistical data where available:
● More Convenient Installation
Wireless systems don’t require complicated wire setups, making them far easier to install. This is particularly useful in existing buildings where adding new wires can be disruptive. Installation times can be reduced by as much as 70%, making it a quick setup.
● Higher Flexibility
You can easily add, move, or replace units with wireless sensors whenever needed. This adaptability makes it ideal to expand the system as your needs grow or change gradually. In practice, users find installation flexibility increases efficiency by up to 50%.
● Improved Cost-Effectiveness
Skipping the need for extensive wiring slashes costs significantly. The savings for large homes or offices can be as much as 30-40% compared to traditional wired systems.
● Better Aesthetics
Without wires, your home looks neater and more visually appealing. The absence of visible wires enhances the interior design, which many homeowners and decorators appreciate.
● Easier Maintenance
Wireless sensors simplify the maintenance process. You can access and replace them without the hassle of dealing with wires. This reduces the downtime typically associated with maintenance and improves system reliability by up to 25%.
● Stronger Adaptability
These sensors can be placed almost anywhere, even in hard-to-wire spots like ceilings and around doors and windows. This flexibility confirms better coverage and proper detection capabilities that increase the effective detection area by up to 40%.
● More Energy-Efficient
Wireless sensors often use low-power designs, which prolong battery life and cut down on energy use. Some systems show a reduction in energy consumption by up to 60%, making them a greener option.
Applications of Wireless Sensor Networks in Home Security
Wireless sensor networks can do a lot for home security. Let’s talk about how they can be used in a way that’s really easy to understand:
1. Detecting Intruders
Consider wireless sensors as your home’s secret watchers. They can tell when someone is trying to break in, whether through a door, a window, or even breaking the glass. For example, if a door sensor notices that a door opens when it shouldn’t, it quickly tells the main system (hub), and then, based on what you’ve setup before, like sounding an alarm or sending you an alert, it does that right away.
2. Spotting Smoke and Fire
Smoke detectors are always on the lookout, day and night. If they sniff out more smoke than they think is normal, they’ll work with alarm sirens to make a lot of noise with a buzzer and flashlights to tell everyone something’s wrong. At the same time, they let the hub know so more steps can be taken, such as sending notification to your mobile app along with you anywhere, or a third-party emergency center.
3. Finding Water Leaks
Water leak detectors keep an eye out for unwanted water in places it shouldn’t be, like from a leak. If they find anything, then the water leak detector sends a message to the hub to let you know so you can shut off the plumb remotely and fix the problem before it gets bigger.
4. Checking the Climate Indoors
Some sensors keep track of how warm or cool your home is and how moist or dry it is. This is not just to keep you comfortable but also to help manage energy use. If the temperature or humidity goes out of your preferred range, the temperature humidity monitor will let the hub know and the hub can adjust things automatically, like turning the heating down or up.
5. Watching Over Home Energy Use
These sensors work like a smart electricity meter. They watch how much electricity everything in your house is using, calculate stuff like total power used, and figure out when you use the most electricity. This data goes to the hub, which can help you see your energy habits and find ways to use less and save money.
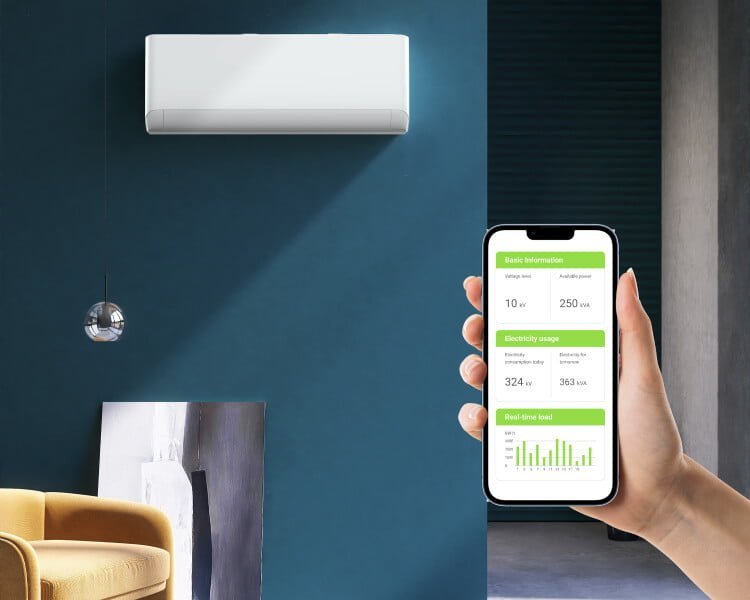
For all these uses, while specific statistical data like exact percentages of energy saved or the increased speed of alerts might vary widely depending on the system and the setup, the impact is still undeniable.
For example, knowing your energy use patterns can lead to a 10-30% reduction in unnecessary electricity use. Similarly, early detection of fires or water leaks can save lives, prevent property damage, and save on potential costs that could run into thousands of dollars.
Challenges of Deploying Wireless Sensor Network for Home Security System
Here’s an explanation of the challenges with setting up wireless sensor networks:
1. Signal Problems
Just like when your cell phone loses signal, wireless sensors can encounter interference. They can be blocked by thick walls or messed up by other gadgets that use similar signals. Studies show that these issues can cause trouble in 30% of wireless networks, ultimately making sensors less reliable.
Also read: Why smart home devices prefer sub-ghz radios?
2. Short Battery Life
Sensors need power from batteries, but those batteries don’t last forever. Sometimes, you might need to change them quite often, which can be a hassle and cost a lot. In fact, about 60% of the expense of keeping a wireless network going is just for taking care of the batteries.
3. Data Leaks
When sensors are sending information about your home, there’s a risk someone could try to steal that data. Around 70% of small smart devices can be at risk for data breaches, so it’s important to ensure all that personal information is encrypted and secure.
Also read: why wireless security systems like to use proprietary network?
4. Devices Not Matching
If you’ve ever had chargers that don’t fit your phone, you know what it’s like when devices don’t work together. Wireless sensors from different companies can sometimes have the same issue. Up to 40% of people with smart home tech face these compatibility headaches.
5. Complicated Networks
Managing a network of wireless sensors is like being an air traffic controller. If you don’t keep everything organised, messages can get lost or delayed. Getting this right is tricky, but it is necessary to make sure that all the sensors communicate with each other properly without any information slipping through the cracks.
Let Roombanker Enhance Your Wireless Sensor Network Used for Home Security Solutions
Keep your home safe with Roombanker’s wireless sensor network. Our easy-to-install security devices, such as motion sensors, door sensors, and panic buttons, will watch over your house, apartment, or shop—no tech expert is needed. With Roombanker, you can set up a smart security system in about 30 minutes!
Our Roombanker Hub connects all devices, creating a shield that’s tough to break, covering up to 3,500 meters. With our RB Link App, control your security from anywhere. Plus, with a backup battery that lasts 8 hours, you’re protected even during power cuts.
Add more security and fun to your space with 64 different settings to make your home just how you like it. And the best part? No extra costs after setup.
Choose Roombanker wireless security alarm system for a worry-free way to keep your spaces and loved ones secure.