
A PIR sensor is often described as a simple motion detector, but in a security alarm system, its performance depends heavily on how it is installed. A good detector can still create missed detection or unwanted alarms if it is mounted in the wrong place, aimed at the wrong area, or handed over without proper testing.
A PIR sensor is only as reliable as its placement, configuration, and final testing. Good installation is not just mounting the device on a wall. Installers must check the protected area, entry path, heat sources, pets, mounting height, signal strength, walk test, app test, tamper, and battery status before the device is considered ready for use.
This guide provides a practical PIR sensor installation checklist for alarm installers, distributors, and professional security projects. It focuses on intrusion alarm PIR sensors, not lighting sensors, Arduino modules, or general electrical wiring tutorials.
What This PIR Sensor Installation Checklist Is For
This checklist is for security alarm PIR sensor installation. It is intended for installers and project teams who need to place, configure, test, and hand over PIR detectors as part of an alarm system.
It is not a complete guide for every type of PIR device. A lighting PIR used to switch on lamps has different priorities. An Arduino PIR module is usually used for electronics learning or simple sensing projects. A professional alarm PIR sensor must be evaluated as part of a wider security system, including alarm zones, hub communication, tamper reporting, app events, and final testing.
This checklist is useful for:
- Alarm installers planning PIR placement
- Distributors supporting customer projects
- Security system designers checking detector coverage
- Project teams preparing installation and handover procedures
Video setup reference: How to Set Up and Install PIR Sensor
Use these videos as setup references, but always follow the specific product manual, mounting height, local project requirements, and on-site testing results before final installation.
Before Installation: Understand the Room and Entry Path
Before choosing a mounting position, installers should first understand the room.
Check:
- Room size and shape
- Main entry doors
- Windows and glass doors
- Corridors and narrow paths
- Corners and blind areas
- Furniture layout
- Likely movement routes during intrusion
- Areas that should not be monitored
PIR placement should consider how a person crosses detection zones, not just where mounting is convenient. A PIR detector usually performs better when expected movement crosses its detection pattern rather than moving directly toward the sensor from a narrow straight line.
For example, in a room with one main entrance, the detector should usually cover the path from the door into the room. In a corridor, it should be positioned to monitor likely movement without being blocked by doors, cabinets, or partitions. In a corner installation, the detector should cover the protected area while avoiding windows, heat sources, and unnecessary movement outside the alarm zone.
Choose the Right PIR Sensor Placement
Good PIR sensor placement starts with the protected area. The detector should be mounted where it can cover the likely entry path and movement route, while avoiding objects that block the detection zones.
Common placement options include:
| Placement type | Best use | Installation note |
|---|---|---|
| Corner placement | Wide room coverage | Useful when the detector needs to cover several directions |
| Wall placement | Focused room or entrance coverage | Match the angle to the main entry path |
| Corridor placement | Long, narrow movement path | Avoid aiming at windows or reflective surfaces |
| Entrance coverage | Door and access point protection | Aim across the likely walking route |
| Room coverage | General interior protection | Check furniture and blind areas before final mounting |
Avoid placing the PIR where detection zones are blocked by:
- Tall furniture
- Cabinets
- Shelves
- Curtains
- Plants
- Display racks
- Open doors
- Partition walls
Installers should also consider future layout changes. A detector that works during installation may become less reliable if a cabinet, shelf, or display stand is later placed in front of it.
Mounting Height: Follow the Detector’s Installation Instructions
Each detector model may have its own recommended mounting height. Installers should follow the specific product manual instead of applying one fixed height to every PIR sensor.
As a Roombanker example, Indoor PIR recommended installation height is 1.8 m to 2.4 m. This range helps the detector view the protected area as intended, including its detection pattern and pet immunity conditions.
Outdoor or dual-tech detectors may require different installation checks. For example, Roombanker Outdoor PIR mounting height is 1.8 m to 2.2 m. Outdoor detectors also require more attention to weather exposure, sunlight, animals, moving plants, driveways, and other environmental factors.
Video setup reference: How to Install Outdoor Motion Detector (PIR + Microwave)
Use these videos as setup references, but always follow the specific product manual, mounting height, local project requirements, and on-site testing results before final installation.
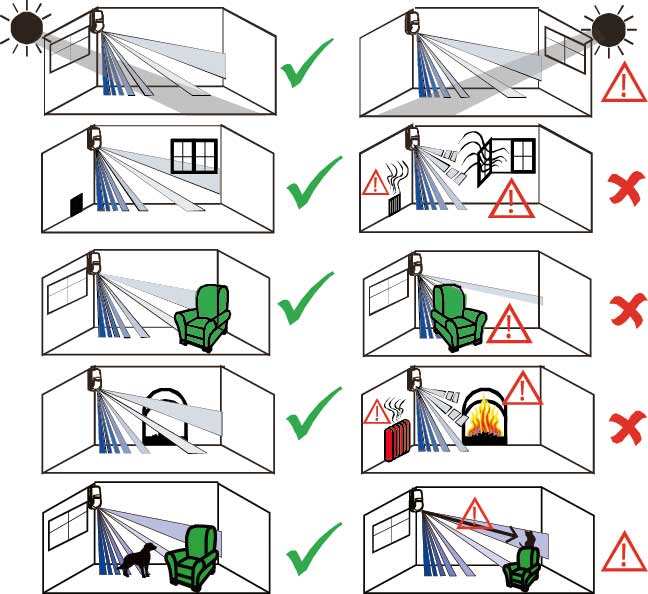
Avoid Heat Sources, Sunlight, Windows, and Airflow
A PIR sensor detects infrared changes. It does not identify a person like a camera. Because of this, the surrounding environment has a direct effect on detection reliability and false alarm risk.
Avoid installing PIR sensors where they face or sit close to:
- Direct sunlight
- Windows or glass doors
- Strong reflections
- Heaters
- Fireplaces
- Radiators
- HVAC vents
- Warm airflow
- Moving curtains
- Plants
- Insects near the lens
Sunlight can heat surfaces or create changing reflections. HVAC airflow can move warm or cool air through the detection area. Curtains and plants may move repeatedly. Insects close to the lens may create local disturbance. These conditions do not always cause false alarms, but they can increase risk.
A good installation should reduce avoidable thermal and movement interference before relying on sensitivity settings to solve the problem.
Check Pets Before Setting PIR Sensitivity
Pet immunity is useful, but it is conditional. It should not be treated as a guarantee that pets can never trigger a PIR sensor.
As a Roombanker example, Indoor PIR pet immunity is up to 10 kg, subject to installation height and environment. Outdoor PIR pet immunity is up to 35 kg, subject to installation conditions.
Installers should check:
- Pet size and weight
- Whether pets can climb onto furniture
- Stairs near the detection area
- High shelves or window ledges
- Movement paths close to the detector
- Whether pets may move directly under or near the lens
- Whether the room layout changes the expected pet immunity zone
Sensitivity should be set according to the room, protected area, pet presence, and false alarm risk. Higher sensitivity is not always better. In some spaces, a lower or properly matched setting may provide better stability while still covering the required intrusion path.
Pair the PIR Sensor and Check Signal Strength
For wireless PIR sensors, pairing should be completed before final mounting. Installers should confirm that the detector can communicate with the hub or alarm system from the actual mounting position.
Do not pair the detector on a desk and assume the signal will be the same after it is installed on a wall. Walls, distance, metal surfaces, layout, and building materials can affect wireless communication.
Roombanker Indoor PIR supports app remote setting and testing, signal strength detection, and RBF communication. It supports up to 3,100 m open space with Hub.
Open-space wireless range is a reference value; installers should check signal strength at the actual mounting location.
Before drilling or fixing the detector permanently, check:
- Device pairing status
- Signal strength at the mounting point
- Hub communication
- App visibility where supported
- Zone or device naming
- Event reporting behavior
This step can prevent later service calls caused by weak signal or poor placement.
Run a Walk Test Across the Protected Area
A walk test confirms whether the PIR sensor covers the intended area. It should be done after pairing, placement, and basic configuration.
A useful walk test should include:
- Main entry path
- Side entry path if relevant
- Room center
- Detection edge areas
- Corners and possible blind spots
- Pet movement areas where relevant
- Different walking speeds
- Movement from different directions
Installers should not test only by waving a hand directly in front of the detector. That does not prove the protected area is properly covered. The goal is to confirm real movement paths, not only short-range sensor reaction.
Where app testing is supported, installers can use app feedback or event logs to confirm detection behavior. If the walk test shows missed areas or unwanted triggers, adjust placement, angle, or sensitivity and test again.
Test Tamper, Battery, and Alarm Event Reporting
A PIR sensor installation is not complete until alarm event reporting and maintenance signals are checked.
Installers should test:
- Motion alarm event reporting
- Tamper alarm reporting
- Rear tamper function where supported
- Battery status
- Low battery notification
- App event display where supported
- Zone name and device label
- Hub or system response
- Siren or monitoring workflow where configured
Roombanker Indoor PIR supports tamper protection, rear tamper protection, low battery notification, and app testing. These functions should be checked during installation rather than assumed.
Clear zone naming also matters. A label such as “PIR 1” may be unclear during an alarm event. A better zone name may identify the protected area, such as “Shop Rear Door PIR” or “Office Corridor PIR,” depending on the project.
Common PIR Sensor Installation Mistakes
| Mistake | Why it matters | How to fix |
|---|---|---|
| Mounting too high or too low | Detection pattern may not match the protected area | Follow the detector’s recommended installation height |
| Facing windows | Sunlight and reflections may increase false alarm risk | Aim away from windows where possible |
| Installing near heater or HVAC | Warm airflow can create unwanted infrared changes | Move the detector away from heat and airflow sources |
| Blocked by furniture | Detection zones may be hidden | Check coverage before final fixing |
| Ignoring pets | Pet movement can trigger alarms under some conditions | Review pet size, routes, furniture, and sensitivity |
| Skipping walk test | Coverage gaps may remain unnoticed | Test expected entry paths and edge areas |
| Not checking signal strength | Wireless communication may be unstable | Test signal at the actual mounting location |
| Unclear zone names | Alarm events become harder to understand | Use location-based zone labels |
| Skipping tamper test | System may not report device interference correctly | Test tamper before handover |
| Skipping battery check | Maintenance issues may appear soon after installation | Confirm battery status and low battery reporting |
PIR Sensor Installation Checklist for Installers
| Checklist item | What to verify |
|---|---|
| Room size | The detector range is suitable for the room |
| Entry path | The PIR covers likely intrusion movement |
| Protected area | The sensor is aimed at the required zone, not irrelevant movement |
| Mounting height | The detector follows the product manual |
| Heat sources | No heater, radiator, fireplace, or strong warm airflow affects the sensor |
| Sunlight and windows | The detector is not aimed at direct sunlight or reflective glass |
| Obstacles | Furniture, cabinets, curtains, and shelves do not block detection |
| Pet presence | Pet size, movement path, and furniture access are considered |
| Sensitivity | Setting matches the room, risk area, and pet conditions |
| Pairing | Wireless PIR is paired with the hub or system |
| Signal strength | Signal is checked at the actual mounting position |
| Walk test | Entry path, edge areas, and blind spots are tested |
| App test | App setting, testing, and event display are checked where supported |
| Tamper test | Tamper or rear tamper reporting is verified |
| Battery status | Battery and low battery notification are checked |
| Zone label | Device name clearly identifies the protected area |
| Customer handover | User understands the protected area and maintenance reminders |
This checklist should be adapted to the project and product manual. No single installation method fits every room or every outdoor site.
FAQ
What is the best place to install a PIR sensor?
The best place is usually where the PIR can cover the likely entry path and protected area without facing sunlight, windows, heat sources, airflow, or moving objects. Corner or wall placement is common, but the final position depends on the room layout and detector manual.
How high should a PIR sensor be mounted?
It depends on the detector model. As a Roombanker example, Indoor PIR recommended installation height is 1.8 m to 2.4 m. Outdoor PIR mounting height is 1.8 m to 2.2 m. Always follow the specific installation instructions.
Should a PIR sensor face a window?
Usually, it is better to avoid facing a PIR sensor directly toward windows or strong sunlight. Reflections and changing heat from sunlight can increase false alarm risk.
How do you test a PIR sensor after installation?
Run a walk test across the protected area, including entry paths, edge areas, and possible blind spots. Also check app events where supported, signal strength, tamper reporting, and battery status.
Why does PIR sensor placement affect false alarms?
A PIR sensor reacts to infrared changes. Poor placement near sunlight, heaters, HVAC airflow, curtains, plants, or pets can create unwanted signals that increase false alarm risk.
Can pets trigger a PIR sensor?
Yes, pets can trigger a PIR sensor in some conditions. Pet immunity depends on pet size, installation height, movement path, furniture, stairs, and environment. It should not be treated as pet-proof protection.
Do wireless PIR sensors need signal strength testing?
Yes. Wireless PIR sensors should be tested at the actual mounting location before final fixing. Open-space range is only a reference value, not a guarantee of real installation signal strength.
Should installers test tamper and battery status?
Yes. Installers should test tamper reporting, battery status, low battery notification, alarm events, and app display where supported before handover.